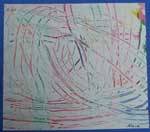
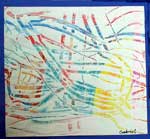
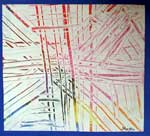
Cardboard Comb Designs
by Shelley Port
Grades K - 2
Montgomery Elementary School
 |
 |
|
|
Please
click on image to see it larger
|
||
by Shelley Port
Grades K - 2
Montgomery Elementary School
|
|
|
|
Please
click on image to see it larger
|
||
Curriculum Integration: Integrates nicely with studies of patterns and lines (geometry) as well as art appreciation. Students will observe and discuss designs by Henri Matisse and those used on plaid fabrics and come to an understanding of nonobjective designs before creating their own designs. You may also examine examples of calligraphy to see how a variety of line widths are utilized. If the Spectra slides are not available, actual samples of plaid fabric and photographs of Matisse paintings from an art source book are excellent references.
Materials:
- plaid fabric samples and/or
- Spectra slides (optional)
- plaid fabric, slide 8
- Purple Robe and Anemones, slide 1
- Art Processes and samples, slides 9 & 10
- 2" x 3" stiff cardboard piece for each student
- white tempera paint
- wax crayons
- 9" x 12" construction paper or oak tag
- white glue or liquid soap
- scissors
- a 1" stiff bristle brush
- newspaper to cover work surfaces
Part I: Preparing the Materials
To make the combs, cut a series of unevenly spaced notches into one long edge of the 2" x 3" pieces of cardboard. Mix a tablespoon or more of white glue or liquid soap into a pint of white tempera. Apply crayon to a section of construction paper or oak tag, pressing firmly. Then test to see that the paint mixture will cover a heavily crayoned surface without beading up. Set up the paint mixture and brushes at several paint stations.
Part II: Providing a Background for Students
Show the slides and/or plaid materials and describe how the design was made by creating lines of different widths at right angles. Demonstrate by drawing plaid on the chalkboard with the side and point of the chalk. Discuss how a design can be made with lines that don't look like any particular objects (non-objective designs). Show Slide 1 or photographs, and ask students to identify the different kinds of lines that make up the patterns in the painting. Remind students that some of the line patterns were made by scraping off the paint. Ask student to guess how the stripes of the robe could have been made into a plaid or zigzag design. Tell students that they will make their own nonobjective designs using lines made with a cardboard comb, showing the slides 9 & 10 if available.
Part III: Creating the Designs
Demonstrate how to paint over a crayoned surface with the special paint mixture. While the liquid is still glossy, comb across it with the notched cardboard. Smooth the paint surface and then show a zigzag, curve or plaid, repeating the combed line all over the surface to reveal lines of color beneath. Discuss the different kinds of possible lines: straight and curved, with varying thicknesses.
Distribute paper and crayons. Allow time for students to design a patchwork of colored areas, completely covering their papers with thick, waxy crayon. At the paint stations, students will paint the surface, and choose a cardboard comb to make the designs.
Back
© Deborah Padrick 2001