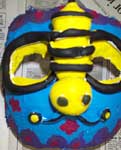
This is an art lesson created to accompany a larger unit on the rain forest. Students in our class created plaster gauze masks to wear for their performance in "The Great Kapok Tree".
Objectives: Students will learn the process of mask making and how it relates to theater and story telling.
Materials Needed:Preparation:
- Books: The Great Kapok Tree, various other books on rainforest animals
- Plaster gauze strips (Riley Street in bulk)
- Vaseline
- Rubber-bands
- Headbands (Cut out of panty hose)
- Crayola Magic Mold (Riley Street in Bulk)
- Acrylic Paints in various colors
- Parent Volunteers (5-6) on mask making day
- Drill
- Elastic 2 inch wide black (Any Fabric Store)
- No Tear Soap, Towels and Wash Clothes
- Cut gauze into small size strips 4"x1"
- Cut pantyhose into head bands Very important to keep hair out of plaster
- One bucket of warm water
- One bucket of no tear soapy water for kids to wash in and towels
Procedures: Making the Mask
- Apply a generous amount of Vaseline to child's face. Cover the eyebrows and make sure to get the hairline. Any portion of the child's face left uncovered will stick to the plaster.
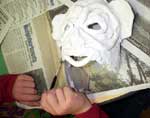
- Dip plaster strips into warm water and remove excess water with fingers before applying to the child's face. Start with two strips across the ridge of the nose forming an "x" across the nose and up through the brow ridge, this will make the mask stronger. Cover the portion of the face from the forehead down to the upper lip and across to the bottom of the ears. This will create a "Masquerade" type mask. Apply at least 3-4 layers of plaster strips.
- Let the plaster set, this process takes about 10-15 minutes. I let the kids swing in the sun to help in the drying process.
- Remove mask. It is easiest to remove if the child scrunches up their face to wiggle it loose. Be very careful removing the mask because it has not fully set.
- Let mask set for 24 hours
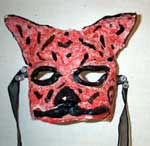
Procedures: Transforming the Mask into an Animal
- Have the children study various animals of the rainforest. Tell them to pay careful attention to the details of their face and head. I made many examples for the children, one example of each animal in The Great Kapok Tree.
- Explain that the plaster masks are very fragile and they need to be very careful with them while working.
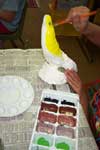
- Use model magic to build up features of the animal's face.
- Let set for 24 hours, if any of the features are coming off or are not securely attached use glue gun or tacky glue to keep in place before you give the masks to the children to paint.
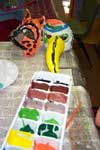
- Set out many colors of acrylic paint for the children to use on their masks. Make sure that you are using the right type of paintbrush. (Tempera brushes work well) Make sure to set out many examples and pictures of animals for the children to look at. Remind children that they need to cover all the white spaces on the outside of the mask with paint, if they would like to have a white space, it needs to be painted white.
- After the masks are complete and dry drill a hole on each side to attach the elastic.
- Have the kids put on the masks and act like the animals they have made or get more elaborate and put on a play. There are so many possibilities!
Back
© Deborah Padrick 2001